Developer Guide
- Acknowledgements
- Setting up, getting started
- Design
- Implementation
- Documentation, logging, testing, configuration, dev-ops
- Appendix: Requirements
-
Appendix: Instructions for manual testing
- Launch and shutdown
- Saving data
- Deleting an application
- List all existing applications
- Clear all existing applications
- Find an application by company name or position
- Sorting the applications list
- Undo the previous command
- Redo the previous command
- Adding an interview
- Removing an interview
- Reminder for upcoming interview(s)
- Data archiving
- Appendix: Effort
Acknowledgements
- We did not reference any sources other than AB3.
Setting up, getting started
Refer to the guide Setting up and getting started.
Design
.puml files used to create diagrams in this document can be found in the diagrams folder. Refer to the PlantUML Tutorial at se-edu/guides to learn how to create and edit diagrams.
Architecture

The Architecture Diagram given above explains the high-level design of the App.
Given below is a quick overview of main components and how they interact with each other.
Main components of the architecture
Main has two classes called Main and MainApp. It is responsible for,
- At app launch: Initializes the components in the correct sequence, and connects them up with each other.
- At shut down: Shuts down the components and invokes cleanup methods where necessary.
Commons represents a collection of classes used by multiple other components.
The rest of the App consists of four components.
-
UI: The UI of the App. -
Logic: The command executor. -
Model: Holds the data of the App in memory. -
Storage: Reads data from, and writes data to, the hard disk.
How the architecture components interact with each other
The Sequence Diagram below shows how the components interact with each other for the scenario where the user issues the command delete 1.

Each of the four main components (also shown in the diagram above),
- defines its API in an
interfacewith the same name as the Component. - implements its functionality using a concrete
{Component Name}Managerclass (which follows the corresponding APIinterfacementioned in the previous point.
For example, the Logic component defines its API in the Logic.java interface and implements its functionality using the LogicManager.java class which follows the Logic interface. Other components interact with a given component through its interface rather than the concrete class (reason: to prevent outside component’s being coupled to the implementation of a component), as illustrated in the (partial) class diagram below.

The sections below give more details of each component.
UI component
The API of this component is specified in Ui.java

The UI consists of a MainWindow that is made up of parts e.g.CommandBox, ResultDisplay, ApplicationListPanel, StatusBarFooter etc. All these, including the MainWindow, inherit from the abstract UiPart class which captures the commonalities between classes that represent parts of the visible GUI.
The UI component uses the JavaFx UI framework. The layout of these UI parts are defined in matching .fxml files that are in the src/main/resources/view folder. For example, the layout of the MainWindow is specified in MainWindow.fxml
The UI component,
- executes user commands using the
Logiccomponent. - listens for changes to
Modeldata so that the UI can be updated with the modified data. - keeps a reference to the
Logiccomponent, because theUIrelies on theLogicto execute commands. - depends on some classes in the
Modelcomponent, as it displaysApplicationobject residing in theModel.
Logic component
API : Logic.java
Here’s a (partial) class diagram of the Logic component:

How the Logic component works:
- When
Logicis called upon to execute a command, it uses theApplicationBookParserclass to parse the user command. - This results in a
Commandobject (more precisely, an object of one of its subclasses e.g.,AddCommand) which is executed by theLogicManager. - The command can communicate with the
Modelwhen it is executed (e.g. to add an application). - The result of the command execution is encapsulated as a
CommandResultobject which is returned back fromLogic.
The Sequence Diagram below illustrates the interactions within the Logic component for the execute("delete 1") API call.

DeleteCommandParser should end at the destroy marker (X) but due to a limitation of PlantUML, the lifeline reaches the end of diagram.
Here are the other classes in Logic (omitted from the class diagram above) that are used for parsing a user command:

How the parsing works:
- When called upon to parse a user command, the
ApplicationBookParserclass creates anXYZCommandParser(XYZis a placeholder for the specific command name e.g.,AddCommandParser) which uses the other classes shown above to parse the user command and create aXYZCommandobject (e.g.,AddCommand) which theApplicationBookParserreturns back as aCommandobject. - All
XYZCommandParserclasses (e.g.,AddCommandParser,DeleteCommandParser, …) inherit from theParserinterface so that they can be treated similarly where possible e.g, during testing.
Model component
API : Model.java

The Model component,
- stores the application book data i.e., all
Applicationobjects (which are contained in aUniqueApplicationListobject). - stores the currently ‘selected’
Applicationobjects (e.g., results of a search query) as a separate filtered list. - stores the filtered
Applicationobjects in another sorted list that is sorted by one of several possible orders. This list is exposed to outsiders as an unmodifiableObservableList<Application>that can be ‘observed’ e.g. the UI can be bound to this list so that the UI automatically updates when the data in the list changes. When the user selects the application index for anEditCommand,DeleteCommand, etc., this is the list that is referred to. - stores a list of
Applicationobjects which have an existingInterviewpresent in them. It is anObservableList<Application>which is used to create the interview list in the UI. - stores the
Applicationobjects which have anInterviewwithin one week from the time the user is using the application as another filtered list. This list is shown to the user in the remind window. - stores a
UserPrefobject that represents the user’s preferences. This is exposed to the outside as aReadOnlyUserPrefobjects. - does not depend on any of the other three components (as the
Modelrepresents data entities of the domain, they should make sense on their own without depending on other components)
Tag list in the ApplicationBook, which Application references. This allows ApplicationBook to only require one Tag object per unique tag, instead of each Application needing their own Tag objects. In addition, Interview is optional in each Application; thus, it is wrapped around with an Optional class to avoid the usage of null.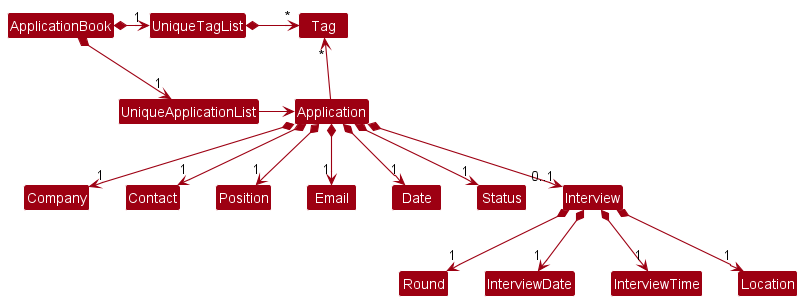
Storage component
API : Storage.java

The Storage component,
- can save both application book data and user preference data in json format, and read them back into corresponding objects.
- inherits from both
ApplicationBookStorageandUserPrefsStorage, which means it can be treated as either one (if only the functionality of one is needed). - depends on some classes in the
Modelcomponent (because theStoragecomponent’s job is to save/retrieve objects that belong to theModel)
Common classes
Classes used by multiple components are in the seedu.application.commons package.
Implementation
This section describes some noteworthy details on how certain features are implemented.
Undo/redo feature
Implementation
The undo/redo mechanism is facilitated by VersionedApplicationBook. It extends ApplicationBook with an undo/redo history, stored internally as an applicationBookStateList and currentStatePointer. Additionally, it implements the following operations:
-
VersionedApplicationBook#commit()— Saves the current application book state in the history. -
VersionedApplicationBook#undo()— Restores the previous application book state from the history. -
VersionedApplicationBook#redo()— Restores a previously undone application book state from the history.
These operations are exposed in the Model interface as Model#commitApplicationBook(), Model#undoApplicationBook() and Model#redoApplicationBook() respectively.
Given below is an example usage scenario and how the undo/redo mechanism behaves at each step.
Step 1. The user launches the application for the first time. The VersionedApplicationBook will be initialized with the initial application book state, and the currentStatePointer pointing to that single application book state.

Step 2. The user executes delete 5 command to delete the 5th application in the application book. The delete command calls Model#commitApplicationBook(), causing the modified state of the application book after the delete 5 command executes to be saved in the applicationBookStateList, and the currentStatePointer is shifted to the newly inserted application book state.

Step 3. The user executes add c/Google … to add a new application. The add command also calls Model#commitApplicationBook(), causing another modified application book state to be saved into the applicationBookStateList.

Model#commitApplicationBook(), so the application book state will not be saved into the applicationBookStateList.
Step 4. The user now decides that adding the application was a mistake, and decides to undo that action by executing the undo command. The undo command will call Model#undoApplicationBook(), which will shift the currentStatePointer once to the left, pointing it to the previous application book state, and restores the application book to that state.

currentStatePointer is at index 0, pointing to the initial ApplicationBook state, then there are no previous ApplicationBook states to restore. The undo command uses Model#canUndoApplicationBook() to check if this is the case. If so, it will return an error to the user rather than attempting to perform the undo.
The following sequence diagram shows how the undo operation works:

UndoCommand should end at the destroy marker (X) but due to a limitation of PlantUML, the lifeline reaches the end of diagram.
The redo command does the opposite — it calls Model#redoApplicationBook(), which shifts the currentStatePointer once to the right, pointing to the previously undone state, and restores the application book to that state.
currentStatePointer is at index applicationBookStateList.size() - 1, pointing to the latest application book state, then there are no undone ApplicationBook states to restore. The redo command uses Model#canRedoApplicationBook() to check if this is the case. If so, it will return an error to the user rather than attempting to perform the redo.
Step 5. The user then decides to execute the command list. Commands that do not modify the application book, such as list, will not call Model#commitApplicationBook(), Model#undoApplicationBook() or Model#redoApplicationBook(). Thus, the applicationBookStateList remains unchanged.

Step 6. The user executes clear, which calls Model#commitApplicationBook(). Since the currentStatePointer is not pointing at the end of the applicationBookStateList, all application book states after the currentStatePointer will be purged. Reason: It no longer makes sense to redo the add c/Google … command. This is the behavior that most modern desktop applications follow.

The following activity diagram summarizes what happens when a user executes a new command:

Design considerations
Aspect: How undo & redo executes:
-
Alternative 1 (current choice): Saves the entire application book.
- Pros: Easy to implement.
- Cons: May have performance issues in terms of memory usage.
-
Alternative 2: Individual command knows how to undo/redo by
itself.
- Pros: Will use less memory (e.g. for
delete, just save the application being deleted). - Cons: We must ensure that the implementation of each individual command are correct.
- Pros: Will use less memory (e.g. for
Data archiving
Implementation
The purpose of this enhancement is to allow users to archive instead of deleting applications that are not applicable in the current time (e.g. applications that have been rejected/offered/no-response for a period of time).
- Data archiving of
Applicationis done by adding a boolean attribute to the Application class as a record of its archive status. - Two predicates in Model to adjust its
FilterListshown to the user. - By applying predicates to the
FilterListinModelManager, the archivedApplicationcan be hidden from the user. - The list showing to the user in the UI is either showing the unarchived applications or the archived application using
ListCommandandListArchiveCommandrespectively unlessFindCommandis used.
The features of the new and modified commands are summarized as follows:
-
ArchiveCommand: Set specified application archive status totrueby utilisingModelManager#archiveApplication. -
RetriveCommand: Set specified application archive status tofalseby utilisingModelManager#retrieveApplication. -
ListArchiveCommand: Show the user the archived applications in CinternS. -
ListCommand: Show the user the unarchived applications in CinternS.
The following sequence diagram shows how the ModelManager works when archive command is executed to update the list shown in UI:
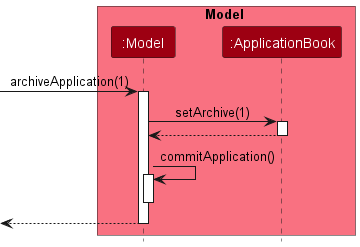
AfterApplicationBook#setArchive is called the Model#archiveApplication will apply the predicate that hides the archived application to the FilterList in Model and the archived application will be hidden from the updated list shown in UI.
Constraints of Data archiving
Archived applications cannot be archived again. Doing so will cause CommandException to be thrown. The same reasoning applies to retrieve command.
Design considerations
Aspect: How should data archiving be implemented?
-
Alternative 1 (current choice): Add a boolean attribute to Application class.
- Pros: Concise implementation as only predicates and a few new commands are added to make it work.
- Cons: Current tests need to be modified.
-
Alternative 2: Adding archived application to a list similar to UniqueApplicationList as record.
- Pros: Less effort to maintain the previous test case as this implementation makes only minor modification on previous classes.
- Cons: Too much duplication and maintenance of actual code (Another copy of UniqueList need to be created and maintained).
Aspect: Should the user be allowed to edit archived application directly?
-
Alternative 1 (current choice): User are allowed to edit archived application
- Pros: A more convenient usage for the user.
- Cons: Less “hidden” nature of archiving data.
-
Alternative 2: User are not allow to edit archived application
- Pros: Usage of archive is more intuitive as archive applications are only used for future references.
- Cons: Inconvenient usage as the user need to retrieve archived application before editing it.
- Alternative 1 is chosen in this case by referencing Whatsapp archived chat where the user can still send message (make modification) in the archived chat.
Interview Feature
Implementation
The Interview feature acts as one of the fields under Application. Interview itself contains four different compulsory fields in order to let Interview exist, which are Round, InterviewDate, InterviewTime and Location.
The class diagram is as follows:

Since an Application can have either zero or one Interview, hence Interview is wrapped with Optional class, with Optional.empty() assigned to the Interview field if the Application does not have an interview yet.
New commands are added to facilitate the operations of Interview.
-
AddInterviewCommand: UtilisingApplicationBook#setApplication()to assign newInterviewtoApplication. -
DeleteInterviewCommand: UtilisingApplicationBook#setApplication()to resetInterviewto empty in anApplication.
- The user enters
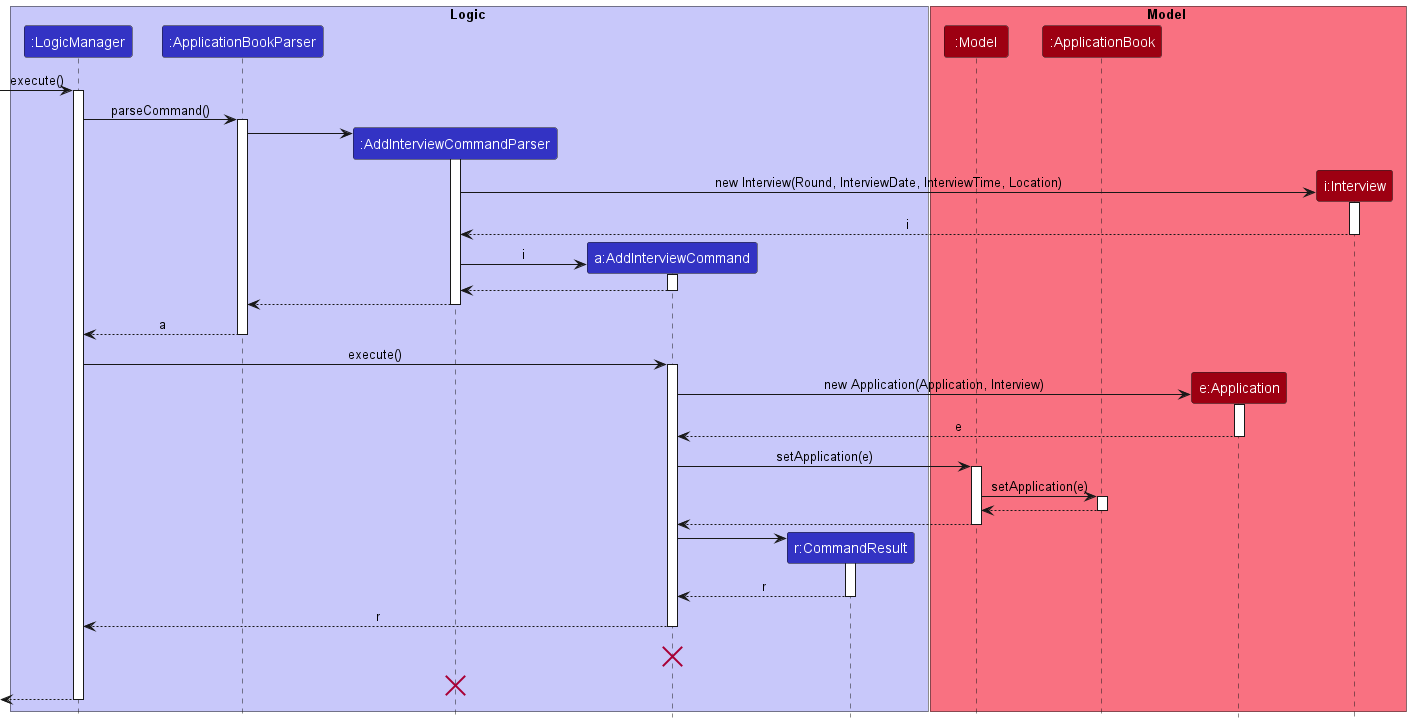
interview 2 ir/Technical interview id/2022-10-12 it/1400 il/Zoomto assign a new Interview to the Application at index 2 in the application list. The execution prompts theLogicManagerto call theApplicationBookParser#parseCommand(String)method. - The ApplicationBookParser then identifies the corresponding
AddInterviewCommandParserto create. Then, the corresponding interview sub-fields are used to instantiate newInterview, which in turn is used to create newAddInterviewCommand. - The LogicManager executes the returned
AddInterviewCommandobject. In here, the target application is retrieved from theApplicationBookto create another newApplicationwith the correspondingInterview. - Now, we replace the old
Applicationobject with the newly createdApplicationobject. But before that, theApplicationBook#setApplication()goes through checks to ensure theApplicationBookdoes not contain duplicatedInterview. (The meaning ofduplicated Interviewis discussed in the Constraints of Interview section below.) - Once the check is passed, the
ApplicationBooksuccessfully replaces the oldApplicationobject, hence it now contains the updatedApplicationobject withInterview. - The
DeleteInterviewoperation with commandremove-i 3has a similar implementation as theAddInterviewoperation, but a newApplicationobject with emptyInterviewis used to replace the oldApplicationobject instead.
The sequence diagram is as follows:
Constraints of Interview
In order for the Interview fields to make sense, several constraints are added:
-
InterviewDatemust be after theApplicationappliedDate, elseInvalidInterviewExceptionwill be thrown. -
Interviewduration is set to be one hour long for eachInterview. - Two Interviews are considered duplicates if they have the same
InterviewDateand overlappingInterviewTime, thenDuplicateInterviewExceptionwill be thrown. - New
Interviewis allowed to overwrite the currentInterviewthat is already assigned to anApplication. This can be considered as anEditInterviewfeature, but we did not explicitly write out this feature as theAddInterviewCommandcan be reused here instead.
Design considerations
Aspect: How should Interview be presented?
-
Alternative 1 (current choice): Interview exists as one of the fields under Application.
- Pros: Easy to implement, represent the real world OOP model.
- Cons: Current tests need to be modified.
-
Alternative 2: Interview exists as another separate list, stored under another new list, called
InterviewBook.- Pros: Tests do not need to be modified, only new tests need to be added.
- Cons: Too much duplication of code (Another copy of ApplicationBook).
Find Feature
Design considerations
Aspect: What fields should the find command search through?
-
Alternative 1 (current choice):
findcommand finds all applications whose company name and/or position contain any of the specified keywords.- Pros: Aligns with the definition of duplicate application, where applications are uniquely identified by their company name AND position.
- Cons: Tests need to be modified to take into consideration finding by more than 1 field.
-
Alternative 2:
findcommand finds only all applications whose company name contain any of the specified keywords.- Pros: Easy to implement, with minimal modification to existing tests.
- Cons: Limited breadth of search, does not align with definition of unique application.
Sort Feature
Implementation
The sort feature allows the user to sort the application list using company names, positions, application dates or interview dates. Each of these orders can also be reversed.
The class diagram below shows the classes in the Logic component relevant for sorting:
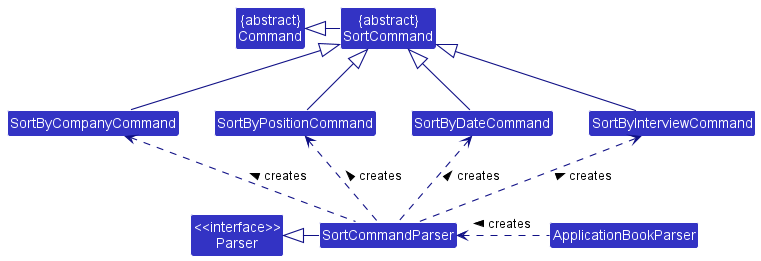
There is an abstract SortCommand class that inherits from the abstract Command class. Then, there is a concrete SortCommand subclass for each possible order of sort. Meanwhile, there is a single SortCommandParser class. When it parses the arguments supplied to a sort command, it decides which of the SortCommand subclasses to instantiate.
The following sequence diagram shows the parsing of a sort command from the user featuring just two of the possible orders - by company and by date:
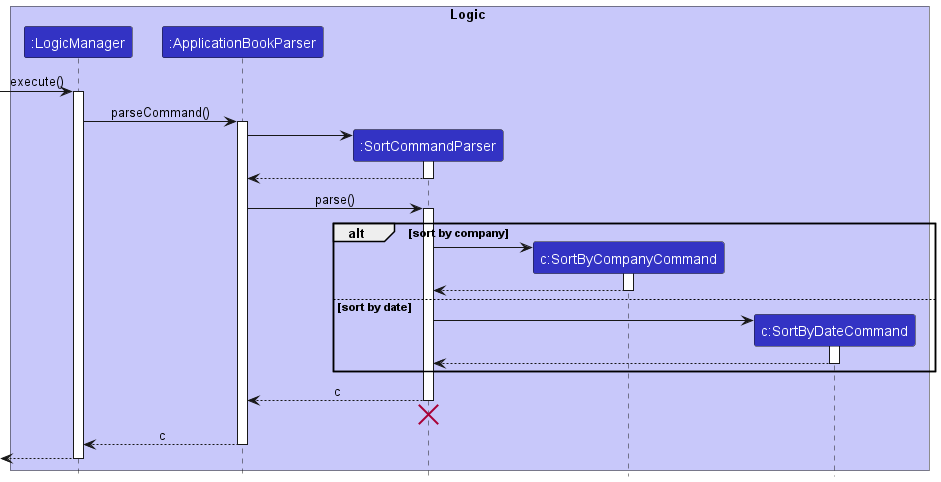
When calling the parse method of the SortCommandParser, the argument provided for the o/ prefix determines which subclass of SortCommand will get created. In the event that the prefix is not provided, a SortByDateCommand is returned by default.
The next sequence diagram shows the execution of the created SortCommand, again featuring just two of the possible orders:
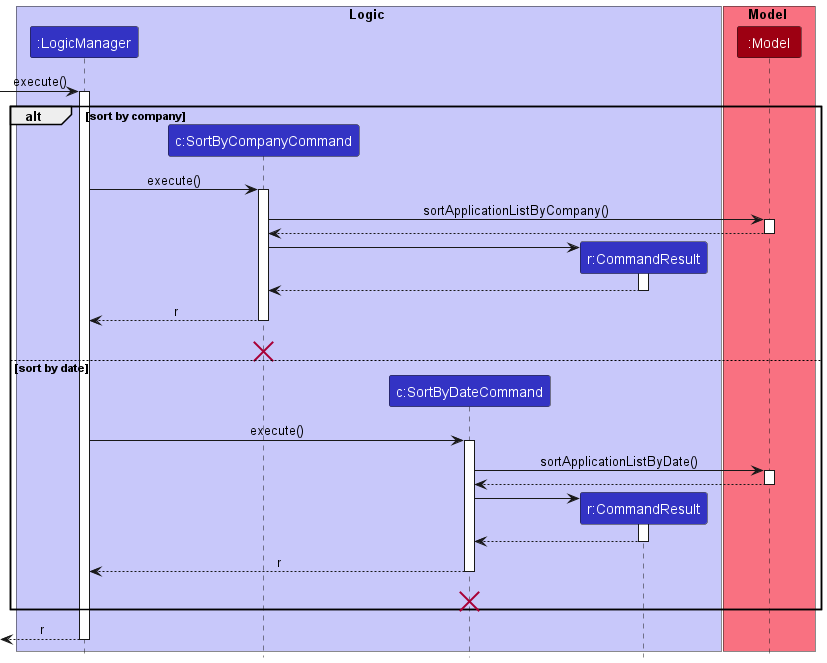
When LogicManager executes the SortCommand created, the SortCommand will call one of the sortApplicationList methods provided by the Model interface for sorting the application list. Internally, the Model wraps its ObservableList of Applications inside a SortedList, so all it has to do is to set an appropriate comparator on the SortedList to attain the desired sort order.
A user may have a sort order that works best for them that they would consistently want to use over the others. To make the experience more convenient for the user, CinternS stores the last used sort order on the hard disk so that it can sort the applications list in that order the next time the app is reopened. This way the user does not need to re-enter the same sort command every session.
The current sort order is represented using a SortSetting enum, which can be one of the 4x2 possible sort orders. This SortSetting is stored in the UserPrefs object together with the other user preferences like screen size. The sort order is then stored inside the preferences.json file to be read the next time the app is opened.
The following sequence diagram shows the process of initialising the sort order of a ModelManager as it is being instantiated:
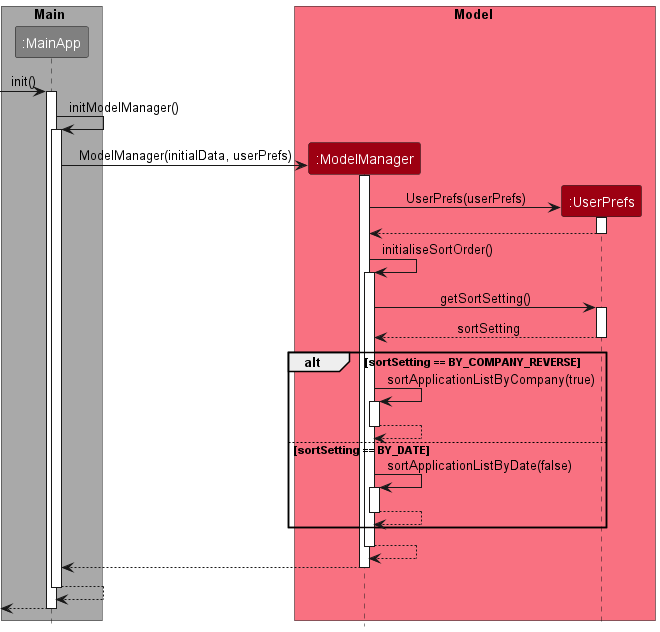
The MainApp passes the application book data and the userPrefs retrieved from storage to the constructor for ModelManager. The ModelManager creates a copy of the userPrefs object. Then, the sortSetting is retrieved and used to decide how the ModelManager should sort the applications. The diagram above shows just two of the possible sort orders and the resulting method calls.
Constraints of Sort Feature
The user can only sort based on one field at a time.
Design Considerations
Aspect: What method(s) to add to the Model interface?
-
Alternative 1: Add a single
sortApplicationListmethod that takes in a booleanshouldReverseand an enum valueorderthat specifies what order to use for sorting.- Pros: Only one method is required. Potentially prevents duplication of similar code.
- Cons: Implementation of the method can become long and complex if many more possible sort orders are added in the future, especially if each sort order’s implementation turn out not to be similar.
-
Alternative 2 (current choice): Add separate methods for every sort order, each only taking a boolean
shouldReverseas argument- Pros: Avoids the need for switch statements to control the behaviour. Implementation of forward and reversed orders likely similar, so code can be shared.
- Cons:
Modelinterface may have many sort methods if many possible orders are added later.
-
Alternative 3: Have 2 methods for each order, one for forward order and one for reverse order.
- Pros: Removes the need for any flag argument.
- Cons: Leads to a lot of code duplication since implementing a reversed sort is likely very similar to implementing the original sort in most if not all cases. Also creates a lot more methods.
Aspect: How to allow the SortCommand to sort using different possible orders when executed?
-
Alternative 1 (current choice): Create separate subclasses of
SortCommandeach for sorting based on a different order.- Pros: Better follows the Open-Closed Principle since none of the current
SortCommandsubclasses need to be edited when a new sort order is implemented. - Cons: Multiple classes associated with a single command word.
- Pros: Better follows the Open-Closed Principle since none of the current
-
Alternative 2: Store an enum value inside each
SortCommandinstance indicating what order to use for sorting. Then, in theexecutemethod, use a switch statement to make the appropriate function calls on theModel.- Pros: Will avoid the need for creating multiple classes.
- Cons: Seems redundant to use another switch statement for controlling the
SortCommandbehaviour after already using one inSortCommandParserfor determining the order to use.
Remind Feature
Implementation
The remind feature allows the user to view a list of upcoming interviews within the next 1 week, sorted by interview date and time.
The rationale for this enhancement is that the interview list on the main GUI window shows all non-archived interviews, including interviews that have passed and interviews scheduled weeks to months later. This feature enables a focused view of only approaching interviews within the next week.
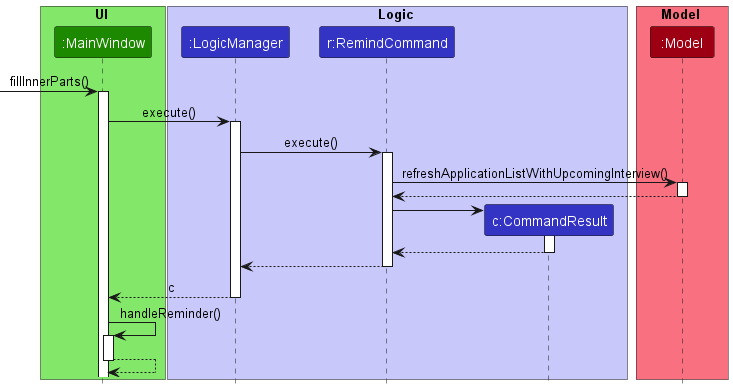
The sequence diagram below shows the crucial components involved in executing the remind command:
Design Considerations
Aspect: How should the remind feature be presented?
-
Alternative 1 (current choice): Upcoming interviews presented in a pop-up window upon
remindcommand input by the user.- Pros: Behaviour lines up better with the rest of CinternS where changes to the display are driven by commands. Better code testability.
- Cons: Users are not reminded of upcoming interviews if they do not enter the
remindcommand.
-
Alternative 2: Pop-up window appears alongside main GUI window upon starting up the application.
- Pros: Better aligns with the purpose of a reminder as a prompt to the user without the user having to input any commands.
- Cons: Could complicate the UI design of the application with the use of more than one primary stage or scene in JavaFX.
Aspect: How should the remind command filter out upcoming interviews?
-
Alternative 1 (current choice): By using an
UpcomingInterviewPredicate.- Pros: Better aligns with the Separation of Concerns principle where the definition of an ‘upcoming’ interview in terms of time is contained within the predicate.
- Cons: Increased coupling between RemindCommand in Logic and a separate predicate class in Model.
-
Alternative 2: By maintaining a list of upcoming interviews in the ModelManager.
- Pros: Reduced coupling between different classes.
- Cons: Each time an action is performed on an application or interview (such as archiving, adding or editing), the list of upcoming interviews has to be informed and updated as well.
Statistic Feature
Implementation
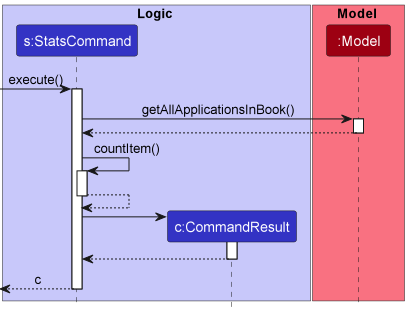
The statistic feature is a simple feature that allows the user to obtain a summarized statistics of the whole application list.
The summary statistics are shown on the UI using the ResultDisplay section. The sequence diagram below shows the workflow of the statistic feature. It gets the list of applications from the model and tabulates the respective information. The tabulation result is then output through CommandResult.
Constraints of Statistic Feature
The statistics of the applications will only show when the user enter stats command. A possible future improvement is to reorganise the UI section to display real-time statistics in one section and the list view of applications and interviews are in another section.
Design Considerations
Aspect: How should the statistic feature be presented?
-
Alternative 1 (current choice): Utilise
ResultDisplaysection in UI to show the user the statistics.- Pros: Does not need extra space in the UI to show the statistics, and simpler and more straightforward implementation.
- Cons: Increase coupling between
ModelManagerandStatsCommandas it requires the list of applications inModelManager.
-
Alternative 2: Create a new section in UI to show the user real-time statistics.
- Pros: Does not increase coupling between classes and align with the implementation of Applications and Interviews list views.
- Cons: Space usage for UI might be inefficient as the user will not always want to review the statistics of the applications.
- Alternative 1 is chosen as our team justified that the implementation is simpler, and is less likely to contain bugs despite the accessing application list from
ModelManager. Furthermore, interview and application lists are more important to be shown on the GUI when compared to the statistics.
Status Feature
Implementation
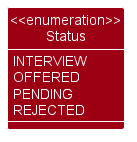
The Status feature allows the user to add a status to a new application and edit the status of their existing application as they progress through the application process.
Constraints of the Status Feature
In order to provide better visualisation of Status with added colours and easy integration with the Statistic feature, only some fixed values of Status can be allowed. As such, users are not able to add any other statuses.
Design Considerations
Aspect: How should the Status feature be implemented?
-
Alternative 1 (current choice):
Statusis implemented as an enum.- Pros: Allows the Statistic feature to easily provide a summary of current applications with application progress already added as status. Can be displayed easily with different colors based on the statuses as the status values are fixed.
- Cons: More restrictive for the users as only a few statuses are allowed (i.e. no custom statuses).
-
Alternative 2:
Statusis implemented as a normal class.- Pros: Gives more freedom to the users to add statuses that they want.
- Cons: Logically
Statuswill become the same asTag, which undermines the purpose ofStatus.
[Proposed] Find Interview Feature
Implementation
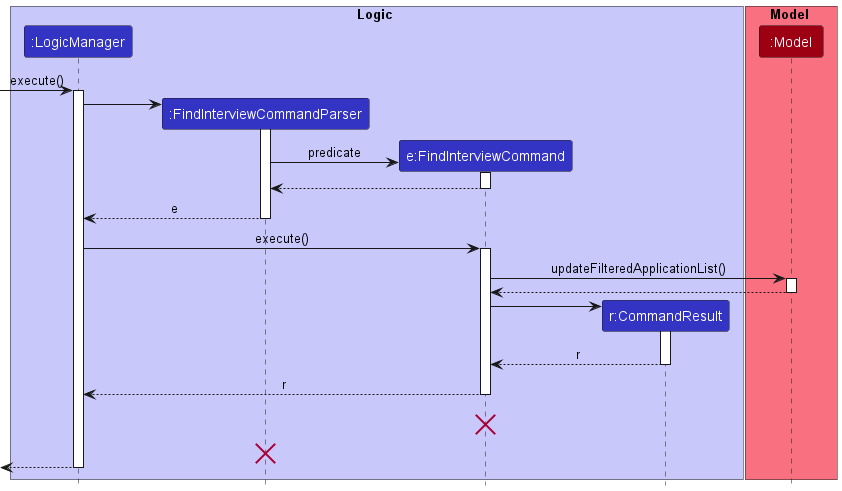
- The user enters
find-i technical interviewto filter the existing interviews with keywordtechnical interviewin one of the interview fields, e.g.Round. The execution prompts theLogicManagerto call theApplicationBookParser#parseCommand(String)method. - The ApplicationBookParser then identifies the corresponding
FindInterviewCommandParserto create. Then, the keywords entered are used to instantiate newPredicateswhich in turn is to be used to construct newFindInterviewCommand. - The LogicManager executes the returned
FindInterviewCommandobject. In here, theFindInterviewCommandcalls theupdateFilteredApplicationList()to set the predicates to theFilteredList<Application>. - Now, the
FilteredList<Application>is ready to be observed by the observers to display the filtered interviews onto the UI.
The sequence diagram below shows the crucial components involved in the find interview feature.
Design Considerations
Aspect: Should find and find-i be combined?
-
Alternative 1 (proposed choice): No, they should be separated.
- Pros: Adhere to Single Responsibility Principle as
findcommand should only be responsible to search for application list. - Cons: Increases LoC while the majority of the codes are similar.
- Pros: Adhere to Single Responsibility Principle as
-
Alternative 2: Yes, they should be combined.
- Pros: Reduces code duplication by just parsing a new prefix into
findcommand e.g.i/to indicate for finding under interview list. - Cons: Violates Single Responsibility Principle.
- Pros: Reduces code duplication by just parsing a new prefix into
Documentation, logging, testing, configuration, dev-ops
Appendix: Requirements
Product scope
Target user profile:
- Computing students
- Need to manage many internship applications
- Prefer desktop apps over other types
- Fast typist
- Prefer typing to mouse interactions
- Comfortable using CLI apps
Value proposition:
Internship applications can stretch over a long period of time, making it hard to keep track of the states of each one. This product will help students keep track of multiple internship application processes more systematically.
User stories
| Priority | As a/an… | I want to… | So that I can… |
|---|---|---|---|
| High | user with many applications | get a list of all existing applications | avoid accidentally applying for the same company and position twice. |
| High | user | delete entries I’ve added in previously | change my mind about those entries. |
| High | user | view a list of all my interviews | recall what interviews I have planned and their details. |
| High | user with many application emails | add details such as round, date, time and location for an interview | avoid sieving through my emails to remind myself of these details. |
| Medium | user with many applications | find applications by the company name or the position | quickly check the details of the applications I need. |
| Medium | user starting a new round of applications | clear all existing applications | avoid having to delete applications one by one to start fresh. |
| Medium | user | add tags to my applications | include miscellaneous remarks of note for each application. |
| Medium | user | sort my applications by their attributes | find applications based on their attributes more easily. |
| Medium | user | save the sort order that I used most recently | avoid having to sort my applications in the same order I want every time I open the app. |
| Medium | user | archive old applications | keep those applications for future reference without crowding my application list. |
| Medium | user | view upcoming interviews happening within 1 week from now | know which interviews I need to prepare for soon. |
| Medium | careless user | undo/redo the previous command | reverse the command that I accidentally executed/undid. |
| Low | user who can type fast | be able to exit the program without using a mouse | use the app more efficiently. |
Use cases
(For all use cases below, the System is the CinternS and the Actor is the user, unless specified otherwise)
Use case: Add an internship application
MSS
- User inputs their application details (i.e. company name, contact number and email of the company, position applied, application date, current application status, etc.)
-
CinternS adds the application into the database.
Use case ends.
Extensions
-
1a. The command is invalid or not recognised.
-
1a1. CinternS shows an error message and prompts the user to reenter command
Use case resumes at step 1.
-
-
1b. CinternS detects the user has entered invalid data format or missed at least one of the fields (e.g. company, position, etc.).
-
1b1. CinternS prompts a warning message and requests the user to reenter.
-
1b2. User inputs the application with all the required fields and in the correct format.
Use case resumes at step 2.
-
Use case: Delete an internship application
MSS
- User requests the list of internship applications.
- CinternS shows the list of internship applications.
- User requests to delete a specific application in the list.
-
Cinterns deletes the application and any interview that is a part of this application.
Use case ends.
Extensions
-
1a. The command is invalid or not recognised.
-
1a1. CinternS shows an error message and prompts the user to reenter command
Use case resumes at step 1.
-
-
2a. The list is empty.
Use case ends.
-
3a. The given index is invalid (e.g. not a number).
-
3a1. CinternS shows an error message.
Use case resumes at step 2.
-
-
3b. The given index is out of bound.
-
3b1. CinternS shows an error message.
Use case resumes at step 2.
-
Use case: Archive an internship application
MSS
- User requests the list of internship applications.
- CinternS shows the list of internship applications.
- User requests to archive a specific application in the list.
-
CinternS archives the application.
Use case ends.
Extensions
-
2a. The list is empty.
Use case ends.
-
3a. The given index is invalid (e.g. not a number).
-
3a1. CinternS shows an error message.
Use case resumes at step 2.
-
-
3b. The given index is out of bound.
-
3b1. CinternS shows an error message.
Use case resumes at step 2.
-
Use case: Retrieve an internship application
MSS
- User requests the list of archived internship applications.
- CinternS shows the list of archived internship applications.
- User requests to retrieve a specific application in the list.
-
CinternS retrieves the application.
Use case ends.
Extensions
-
2a. The list is empty.
Use case ends.
-
3a. The given index is invalid (e.g. not a number).
-
3a1. CinternS shows an error message.
Use case resumes at step 2.
-
-
3b. The given index is out of bound.
-
3b1. CinternS shows an error message.
Use case resumes at step 2.
-
Use case: List all existing internship applications
MSS
- User enters the command to list all existing internship applications.
- CinternS responds with the list of internship applications and their current details. Use case ends.
Extensions
-
1a. The command is invalid or not recognised.
-
1a1. CinternS shows an error message and prompts the user to reenter command
Use case resumes at step 1.
-
Use case: Find an application by company name or position applied
MSS
- User enters the command with the keyword(s) to find an application by.
- CinternS responds with the list of internship applications matching the keyword(s) and their current details. Use case ends.
Extensions
-
1a. The command is invalid or not recognised.
-
1a1. CinternS shows an error message and prompts the user to reenter command
Use case resumes at step 1.
-
-
2a. The list is empty.
-
2a1. CinternS shows an error message.
Use case ends.
-
Use case: Clear all existing applications
MSS
- User enters the command to clear all applications.
- CinternS deletes all applications and interviews and responds with empty application and interview windows. Use case ends.
Extensions
-
1a. The command is invalid or not recognised.
-
1a1. CinternS shows an error message and prompts the user to reenter command
Use case resumes at step 1.
-
Use case: Undo the previous command
MSS
- User enters the command to undo the previous command.
- CinternS returns the state before the changes made by the previous command. Use case ends.
Extensions
-
1a. The command is invalid or not recognised.
-
1a1. CinternS shows an error message and prompts the user to reenter command
Use case resumes at step 1.
-
-
2a. No previous commands have been used that have made changes to the list of applications or interviews.
-
2a1. CinternS shows an error message.
Use case resumes at step 1.
-
Use case: Redo the previously undone command
MSS
- User enters the command to redo the previously undone command.
- CinternS returns the state after the changes made by the previously undone command. Use case ends.
Extensions
-
1a. The command is invalid or not recognised.
-
1a1. CinternS shows an error message and prompts the user to reenter command
Use case resumes at step 1.
-
-
2a. No previous commands have been undone.
-
2a1. CinternS shows an error message.
Use case resumes at step 1.
-
Use case: Obtain a list of upcoming interviews
MSS
- User enters the command to view a list of upcoming interviews.
- CinternS displays upcoming interviews in chronological order. Use case ends.
Extensions
-
1a. The command is invalid or not recognised.
-
1a1. CinternS shows an error message and prompts the user to reenter command
Use case resumes at step 1.
-
Non-Functional Requirements
- Technical requirement: the app should work on all mainstream OS as long as it has Java
11or above installed. - Performance requirements: the app should respond within two seconds for typical usage.
- Quality requirements: the app should be usable by a person who has average computer skills.
- Portability: it should be possible to easily transfer the data from the app to another computer.
- Documentation: user guide should be sufficiently clear such that all users can understand how to use the app after reading the guide.
Glossary
- App: Short for application (the short form is only used to refer to the CinternS program, not internship applications)
- Mainstream OS: Windows, Linux, OS-X
Appendix: Instructions for manual testing
Given below are instructions to test the app manually.
Launch and shutdown
-
Initial launch
-
Download the jar file and copy into an empty folder
-
Double-click the jar file or use the
java -jarcommand in a terminal to launch the application
Expected: Shows the GUI with a set of sample internship applications. The window size may not be optimum.
-
-
Saving window preferences
-
Resize the window to an optimum size. Move the window to a different location. Close the window.
-
Re-launch the app by double-clicking the jar file or using the
java -jarcommand in a terminal.
Expected: The most recent window size and location is retained.
-
Saving data
-
Dealing with missing/corrupted data files
-
Prerequisites: Non-empty data file containing data in the correct format is present in corresponding file path.
-
Test case: Delete a line in the data file before launching the application
Expected: Application launches with an empty application book (no data) -
Test case: Delete the data file before launching the application
Expected: Application launches with data from sample application book
-
-
Launching the application with data from previous session
-
Perform some commands which change the state of the application, such as
add,deleteorinterview(refer toUserGuide.mdfor guidance on how to use these commands) -
Enter
exitto exit the application book -
Re-launch the app
Expected: Application data from the previous session persists to the current session.
-
Deleting an application
-
Deleting an application while all applications are being shown
-
Prerequisites: List all applications using the
listcommand. Multiple applications in the list. -
Test case:
delete 1
Expected: First application is deleted from the list. Details of the deleted application are shown. -
Test case:
delete 1
Expected: First application (originally second) is deleted from the list. Its interview is also deleted. Details of the deleted application are shown. -
Test case:
delete 0
Expected: No application is deleted. Error details are shown. -
Other incorrect delete commands to try:
delete,delete x(where x is larger than the list size)
Expected: Similar to previous.
-
List all existing applications
-
List all applications.
- Test case:
list
Expected: All applications (if any) are shown. Success message is also shown.
- Test case:
Clear all existing applications
-
Clear all applications.
- Test case:
clear
Expected: All applications (if any) are deleted. Success message is also shown.
- Test case:
Find an application by company name or position
-
Find an application matching the specified keyword(s).
-
Test case:
find Google
Expected: All applications matching keyword “Google” are shown. Success message is also shown. -
Test case:
find google
Expected: Similar to previous (case-insensitive). -
Test case:
find software
Expected: All applications matching keyword “software” are shown. Success message is also shown. -
Test case:
find
Expected: Error details are shown.
-
Sorting the applications list
-
Default sort setting
-
Prerequisites: Use an instance of CinternS that has never ran a
sortcommand yet. Multiple applications in the list. -
Expected: The list is being sorted in chronological order of application date.
-
-
Sorting the application list
-
Prerequisites: Multiple different applications in the list. Multiple applications with interviews.
-
Test case:
sort
Expected: The applications list is sorted in chronological order of application date. This is the default sort order when no parameters are supplied to thesortcommand. The interview list should not change. -
Test case:
sort o/company
Expected: The applications list is sorted in alphabetical order of company. The interview list should not change. -
Test case:
sort r/
Expected: The applications list is sorted in reverse chronological order of application date. The interview list should not change. -
Test case:
sort o/interview r/
Expected: The applications list is sorted in reverse chronological order of interview date. Applications with no interviews are all at the bottom of the list. The interview list should not change. -
Test case:
sort o/email
Expected: The application list order does not change. Error details are shown.
-
-
Adding applications to sorted list
- Add an application into the list.
Expected: It appears in the application list in the correct position such that the list remains sorted in its current order.
- Add an application into the list.
-
Modifying interviews in sorted list
-
Prerequisites: Sort the applications list by interview (either in forward or reverse order). Multiple different applications in list. Multiple applications with interviews and without interviews.
-
Test case: Add an interview to an application without an interview.
Expected: The application moves from near the bottom of the application list to the correct position such that the list remains sorted in order of interview date. -
Test case: Remove an interview from an application with an interview.
Expected: The application moves to near the bottom of the application list together with the other applications with no interview. -
Test case: Modify the interview date of an application with an interview.
Expected: The application moves to the correct position in the application list such that the list remains sorted in order of interview date.
-
-
Saving sort setting
-
Prerequisites: Multiple different applications in the list.
-
Run a sort command, for example
sort o/position r/. Close the app. -
Re-launch the app by double-clicking the jar file or using the
java -jarcommand in a terminal.
Expected: The list is still sorted in the order used before closing the app.
-
Undo the previous command
-
Undo a command that has made changes to the application or interview list.
-
Prerequisites: Any command that changes the application or interview list (e.g.
add,delete,clear, etc.) -
Test case:
undo
Expected: The previous state before the change is restored. Success message is shown.
-
-
No such previous command to undo.
-
Prerequisites: No command used or any command that does not change the application or interview list (e.g.
find,sort,remind, etc.) -
Test case:
undo
Expected: Error details are shown.
-
Redo the previous command
-
Redo a command that has made changes to the application or interview list.
-
Prerequisites: Any command that changes the application or interview list (e.g.
add,delete,clear, etc.) andundoare used, in this order. -
Test case:
redo
Expected: The state after the change is restored. Success message is shown.
-
-
No such previous command to redo.
-
Prerequisites:
undois not used. -
Test case:
redo
Expected: Error details are shown.
-
Adding an interview
-
Adding an interview to an application without interview.
-
Prerequisites: Targeted application does not contain an existing interview.
-
Test case:
interview 1 ir/Technical interview id/2022-12-12 it/1400 il/Zoom
Expected: Interview is successfully added to the application with display index 1, success message with application and interview details is shown. -
Test case:
interview 1 ir/Technical interview it/1400 il/Zoom
Expected: Missing interview date field. Interview is not added. Error details are shown. -
Test case:
interview 0 ir/Technical interview it/1400 il/Zoom
Expected: Interview failed to be added. Error details are shown.
-
-
Adding an interview to an application with an existing interview.
-
Prerequisites: Targeted application does contain an existing interview.
-
Test case:
interview 1 ir/Technical interview id/2022-12-12 it/1400 il/Zoom
Expected: Interview is successfully edited to the application with display index 1 by overwriting the old interview, success message with application and interview details is shown.
-
-
Adding a duplicated interview to an application.
-
Prerequisites: Interview with clashing interview date and time is already existing in one of the other applications, e.g.
ir/Technical interview id/2022-12-12 it/1400 il/Zoom. -
Test case:
interview 1 ir/Online assessment id/2022-12-12 it/1400 il/Online. Expected: Interview failed to be added. Error details are shown.
-
Removing an interview
-
Removing an interview from an application.
-
Test case:
remove-i 1
Expected: Interview with displayed index 1 is successfully removed from its application, success message with interview details is shown. -
Test case:
remove-i 0
Expected: Interview failed to be removed. Error details are shown. -
Other incorrect
remove-icommands to try:remove-i,remove-i x(where x is larger than the interview list size)
Expected: Similar to previous.
-
Reminder for upcoming interview(s)
-
Using
remindcommand with Upcoming interviews window not currently open-
Prerequisites: 2 non-archived interviews on two different dates within the next 1 week in the interview list (refer to
interviewsection ofUserGuide.mdfor guidance on how to add interviews) -
Test case:
remind
Expected: Upcoming interviews window launches with the 2 upcoming interviews in chronological order
-
-
Using
remindcommand with Upcoming interviews window open in the background-
Use
interviewcommand to add an upcoming interview -
Test case:
remind
Expected: Upcoming interviews window is brought to the front of the screen with the upcoming interview added in Step 1 displayed on the window
-
-
Using
remindcommand with archived upcoming interview-
Prerequisites: No non-archived upcoming interviews displayed in the interview list. 1 or more archived upcoming interview(s)
-
Test case:
remind
Expected: Upcoming interviews window launches without any interviews displayed
-
-
Using
remindwithremove-iandundo-
Prerequisites: 1 non-archived upcoming interview in the interview list
-
Delete the upcoming interview with
remove-icommand -
Test case:
remind
Expected: Upcoming interviews window launches without the deleted upcoming interview -
Test case:
undofollowed byremind
Expected: Upcoming interviews window is brought to the front of the screen with the upcoming interview displayed on the window
-
Data archiving
-
Archiving an application while all unarchived application shown
-
Prerequisites: List all applications using the
listcommand. Multiple applications in the list. -
Test case:
archive 1
Expected: First application is archived from the list. Details of the archived application is shown. -
Test case:
archive 0
Expected: No application is archived. Error details are shown. -
Other incorrect archive commands to try:
archive,archive x,...(where x is larger than the list size)
Expected: Similar to previous.
-
-
Archiving an application while all archived application shown
-
Prerequisites: List all archived applications using the
list-archivecommand. Multiple applications in the list. -
Test case:
archive 1
Expected: No application is archived. Error details are shown. -
Other incorrect archive commands in this situation are similar to section 1 above.
-
-
Retrieving an application while all unarchived application shown
-
Prerequisites: List all applications using the
listcommand. Multiple applications in the list. -
Test case:
retrieve 1
Expected: No application is retrieved. Error details are shown. -
Test case:
retrieve 0
Expected: No application is retrieved. Error details are shown. -
Other incorrect retrieve commands to try:
retrieve,retrieve x,...(where x is larger than the list size)
Expected: Similar to previous.
-
-
Retrieving an application while all archived application shown
-
Prerequisites: List all archived applications using the
list-archivecommand. Multiple applications in the list. -
Test case:
retrieve 1
Expected: First application is retrieved from the list. Details of the retrieved application are shown. -
Other incorrect retrieve commands in this situation are similar to section 3 above.
-
-
Data archiving with
FindCommand-
Prerequisites: Use
FindCommandwith keywords that match multiple applications in CinternS. Multiple applications in the list. -
Test case:
retrieve 1
Situation 1: First application is an archived application.
Expected : First application is retrieved from the list. Details of the retrieved application are shown. The list remains as the filtered list by the keyword.
Situation 2: First application is an unarchived application.
Expected : No application is retrieved. Error details are shown. -
Test case:
archive 1
Situation 1: First application is an archived application.
Expected : No application is retrieved. Error details are shown.
Situation 2: First application is an unarchived application.
Expected : First application is archived from the list. Details of the archived application are shown. The list remains as the filtered list by the keyword.
-
Appendix: Effort
CinternS was for many of us the first group-based software development project we have done. A significant amount of effort was spent on understanding the existing codebase, gaining more familiarity with technologies like Git and JavaFX and also learning to coordinate with one another.
At the start of the project, the first significant challenge we faced was editing the codebase to work using internship applications instead of persons. Since almost everything in the codebase was dependent on the Person model, a lot of the codebase needed to be edited. Splitting of the work was a challenge because only changing a portion of the codebase would not allow the product to function. Eventually, we did manage to migrate everything over within the first increment 1.2 of the project.
After increment 1.2, we started to implement more features unique to our internship application tracking app. The original address book app (AB3) that CinternS was built from had Persons as the only main entity in the Model. In CinternS, we replaced Persons with Applications and we also have Interviews associated with each Application. We had to study the code from AB3 to understand how the Model works with other components in the program so that we can correctly implement the Application and Interview entities. We also spent more effort in ensuring the two models integrate with each other correctly. In particular, with Interview as one of the fields under Application, storing and extracting Interview into and from the JSON file required a better understanding of the data interchange format.
Along with the two models we also implemented new commands that work with interviews like remove-i and remind. The additional model made coding and testing significantly more difficult since more classes needed to be added. Many bugs were encountered during the development of CinternS due to clashes between the existing features of AB3 and the newly-added features. Significant effort was also invested in modifying the GUI to ensure the features worked together seamlessly.
A key challenge our team encountered was that there were tasks that were highly interdependent. For instance, we had to wait for the model for internship applications to be implemented before the rest of us could contribute to the refactoring of the AB3 codebase to suit internship applications. Some features such as sort and remind also only made sense after the implementation for interview was completed. As such, time management was critical in order to meet internal deadlines, and each of us in the team held ourselves to high standards in this regard to ensure we gave each other sufficient time to deliver our increments.
Another major challenge we faced was with the GUI. Apart from getting the backend to work seamlessly, we had to resolve bugs in the frontend hindering users from fully enjoying the app. Now that we had two different types of entities to display, we had to rework the interface to display both types of information. We had to take care in ensuring the data being displayed remained synchronised with each other and with the data in the model. For instance, we encountered a bug that caused the remind feature to display incorrect data due to the underlying list not being updated correctly. Resolving it took some greater appreciation of the Observer design pattern. We also had to spend extra effort working with JavaFX to adjust some of the components in the GUI and ensure the data is displayed without error. To top everything off, we designed a new GUI that looked neat and intuitive and gave it a new theme colour using CSS to make it stand out from the original version of AB3.